Automatic code test with Jekins.
Outline
- Overview
- Create Jenkins Project
- Configure Jenkins Project
- Create Webhook on Github
- CGI Scripts on a Web Server
- Acknowledgement
Overview
It is critical to build and test your application at various stages of its development. Every once in a while you’ll build the application from the integrated codes (assuming various components or units of the codes have already passed unit test) and run it on test data to make sure the application works as expected and uncover bugs as early as possible. Ideally you’d like to have a system that would trigger the build process upon some specific events, such as the merge of a branch to the master branch from a GitHub repository if you have decided to always build the final application with the codes from the master branch (the master branch is the default branch created when you create a GitHub repository; please click here for more info). This is especially important if the codes are contributed by multiple developers and you want to ensure the integrated codes (and the product built from the codes) in the master branch always in the working condition.
In development of bioinformatics applications, we often build pipelines to manage workflows that integrate various tools to process biological data for data mining and knowledge discovery, such as processing sequence data for the identification of genes or mutations associated with diseases. In such cases, we need to test a pipeline every time new tools are incorporated into the pipeline or parameters are changed for some tools.
Here we present a way we implemented at the bioinformatics group in the Department of Biomedical and Health Informactics of the Children’s Hospital of Philadelphia (CHOP) to automatically run a pipeline with Jenkins when changes to the pipeline codes are pushed or merged to the master branch of the GitHub repository. In this particular case, the pipeline is coded in a snakefile and executed with snakemake. Snakemake is a general-purpose workflow management system coupled with the Python language. Please read the tutorial if you’re not familiar with snakemake. Recipes of the pipeline come from more than one developer, each writing and testing codes in separate branches before pushing the codes and merging with the master branch, the codes of which are used as the production copy. Once the codes from a branch are merged into the master branch, the test on the pipeline with the merged codes are automatically triggered and the status of the test process will be reported to the developers (see below).
Create Jenkins Project
Jenkins is an open source automation server for building, testing and deploying projects. It works in similar ways as Travis CI except that the repository can be from your internal GitHub enterprise server and the tests are done on your own servers. Here we assume you have a Jenkins server set up and created an account on the server for you.
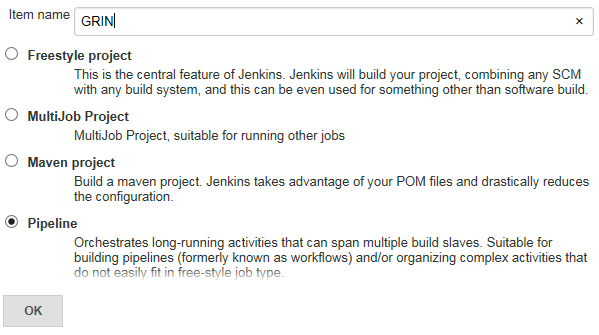
To set up your application under development for continuous integration with Jenkins, the first step is to create a new project (item). In this specific case, we created a pipeline (Fig. 1). You can create other kind of project appropriate for you.
Configure Jenkins Project

Once a Jenkins project is created, you need to set its configuration. Some settings described here are just for your reference and you should set them to fit your case.
Check the following and set their parameters
- Discard Old Builds
- Strategy: Log Rotation
- max # of builds to keep: 6
- GitHub Project
- Project url: http://github.research.chop.edu/BiG/grin/
Set Job Notifications
Add two notification endpoints (at job start or job completion) for Jenkins to send out a notice to a web CGI (Fig. 2). The CGI script jenkinsjobs can be downloaded from the links listed at the end of the blog. Of course you need to point URL to your own web server.
- Format: JSON
- Protocol: HTTP
- Event: Job Started or Job Completed
- URL: http://mitomapd.research.chop.edu/cgi-bin/jenkinsjobs
- Timeout: 30000(ms)
- Log: -1 (send all log messages)
Then check the following options and, if needed, set the settings:
-
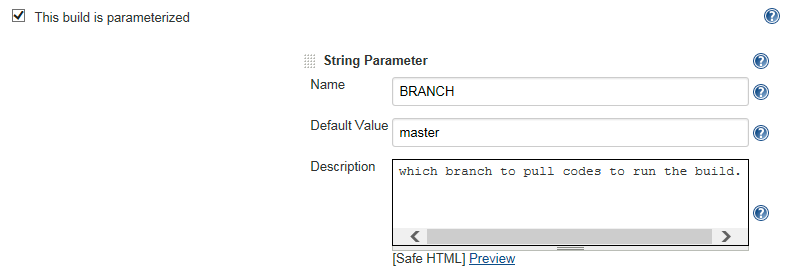
This build is parameterized (Fig. 3)
This option is for branch specification. * select String Parameter * define the name of parameter to use (e.g. BRANCH) * set the default value (e.g. master) * write the description, if needed.
- Prepare an environment for the run
- Keep Jenkins Environment Variables
- Keep Jenkins Build Variables
- Execute concurrent builds if necessary
Build Triggers
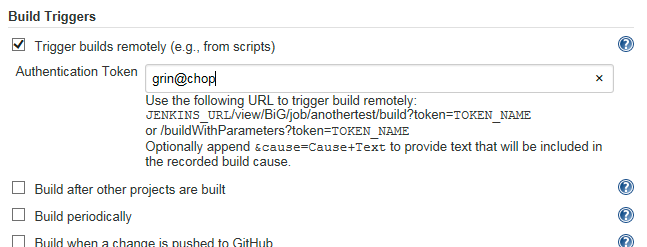
Check Trigger builds remotely (e.g., from scripts) and set Authentication Token. The token will be included in the URL used to trigger the build (Fig. 4).
Please note that here you have the option to set the build to be triggered by a push to a GitHub repository. But we chose not to use this option because we wanted to trigger the build only by a push or merge to the master branch, not just a push to any branches. The webhook you can set up at GitHub doesn’t give you the opiton to specify a specific branch. (Actually for some unknown causes, we could not get it to work after half dozen tries to trigger a build on the Jenkins server upon a push to the GitHub repository.)
Pipeline
You can specify how to run your pipeline when the build is triggered. In our case, we chose to run the pipeline in a Groovy script (selected Pipeline script and check the box Use Groovy Sandbox) on a specific node, as shown below.
node ('respublica-slave') {
    // in Groovy
    stage 'Build'
    sh """
        # cd to the repository directory and check out the specified branch

        git checkout ${BRANCH}
        git pull

        # prepare your environments if necessary

        # our pipeline is coded in a snakefile
        snakemake
    """
}
Create Webhook on Github
On the Github repository page, click Settings on the menubar, then click Hooks & services in the left panel followed by clicking Add webhook button at upper right. On the Webhoooks / Manage webhook frame, specify
-
Payload URL: http∶//mitomapd.research.chop.edu/cgi-bin/jenkins?user=zhangs3&branch=master&token=grin_test@chop&url=http∶//jenkins-ops-dbhi.research.chop.edu/view/BiG/job/grin_master/buildWithParameters
- user: the user account under which to run the build on Jenkins. See comments in the script jenkins on how to authenticate to the Jenkins server.
- branch: the branch(s) a push of which will trigger the build for the specified branch on the Jenkins server. You can specify more than one branch separated by commas (,) or semicolons (:). You must sepcify at least one branch. Here the master branch is specified.
- token: the token from Jenkins project, as specified in the configuration of the Jenkins project (see Fig. 4).
- url: the URL for remotely triggering the build on Jenkins. Change the server name and the path to your Jenkins project to fit your case.
-
Content type: application/x-www-form-urlencoded
Note that you need to change the server and the path to the CGI script jenkins in the URL to fit your case. The script jenkins can be downloaded from the links listed below.
CGI Scripts on a Web Server
Click the script names to get them.
- Script to receive notice from GitHub and trigger the build on Jenkins: jenkins
- Script to receive notifications from the Jenkins server and send notifications (Slack/Email): jenkinsjobs
Acknowledgement
I’d like to thank Jeremy Leipzig for his input and help with the implemenation of the CI system and the preparation of the blog, and thank LeMar Davidson for his help with debugging the configuration of the project on the Jenkins server.